
What Is a Finish Schedule, and Why Does Every Project Need One?
A renovation or a new construction project brings together a dozen trades, hundreds of products, and a series of deadlines that all depend on each other. Tile is set once the waterproofing is signed off. The countertop is templated once the cabinets are in. The plumber sets a valve once someone has chosen the trim that will land on it six weeks from now.
Keeping all of that organized takes more than good intentions. It takes a document, and in interior design that document is the finish schedule. It’s the one place every material, model number, finish, and installation detail lives. It’s also what holds a project together while twelve different people work on it at once.
The sentence we hear most often from clients is some version of “Oh, that’s a decision too?” Which is fair; most people meet these choices for the first time during a renovation. Those small open decisions matter, because when a choice is left open, someone on site makes it for you. Usually a skilled person, making a reasonable call, with the information in front of them.
The installers and builders we work with are genuinely good at what they do. They move fast, which is what you want them doing. Speed works best when there’s a clear plan to build from. When decisions are scattered across a group text, a shared folder, and three showroom visits, the gaps get filled on the fly.
The fix for all of this has a name, and it’s a finish schedule.
What is a finish schedule?
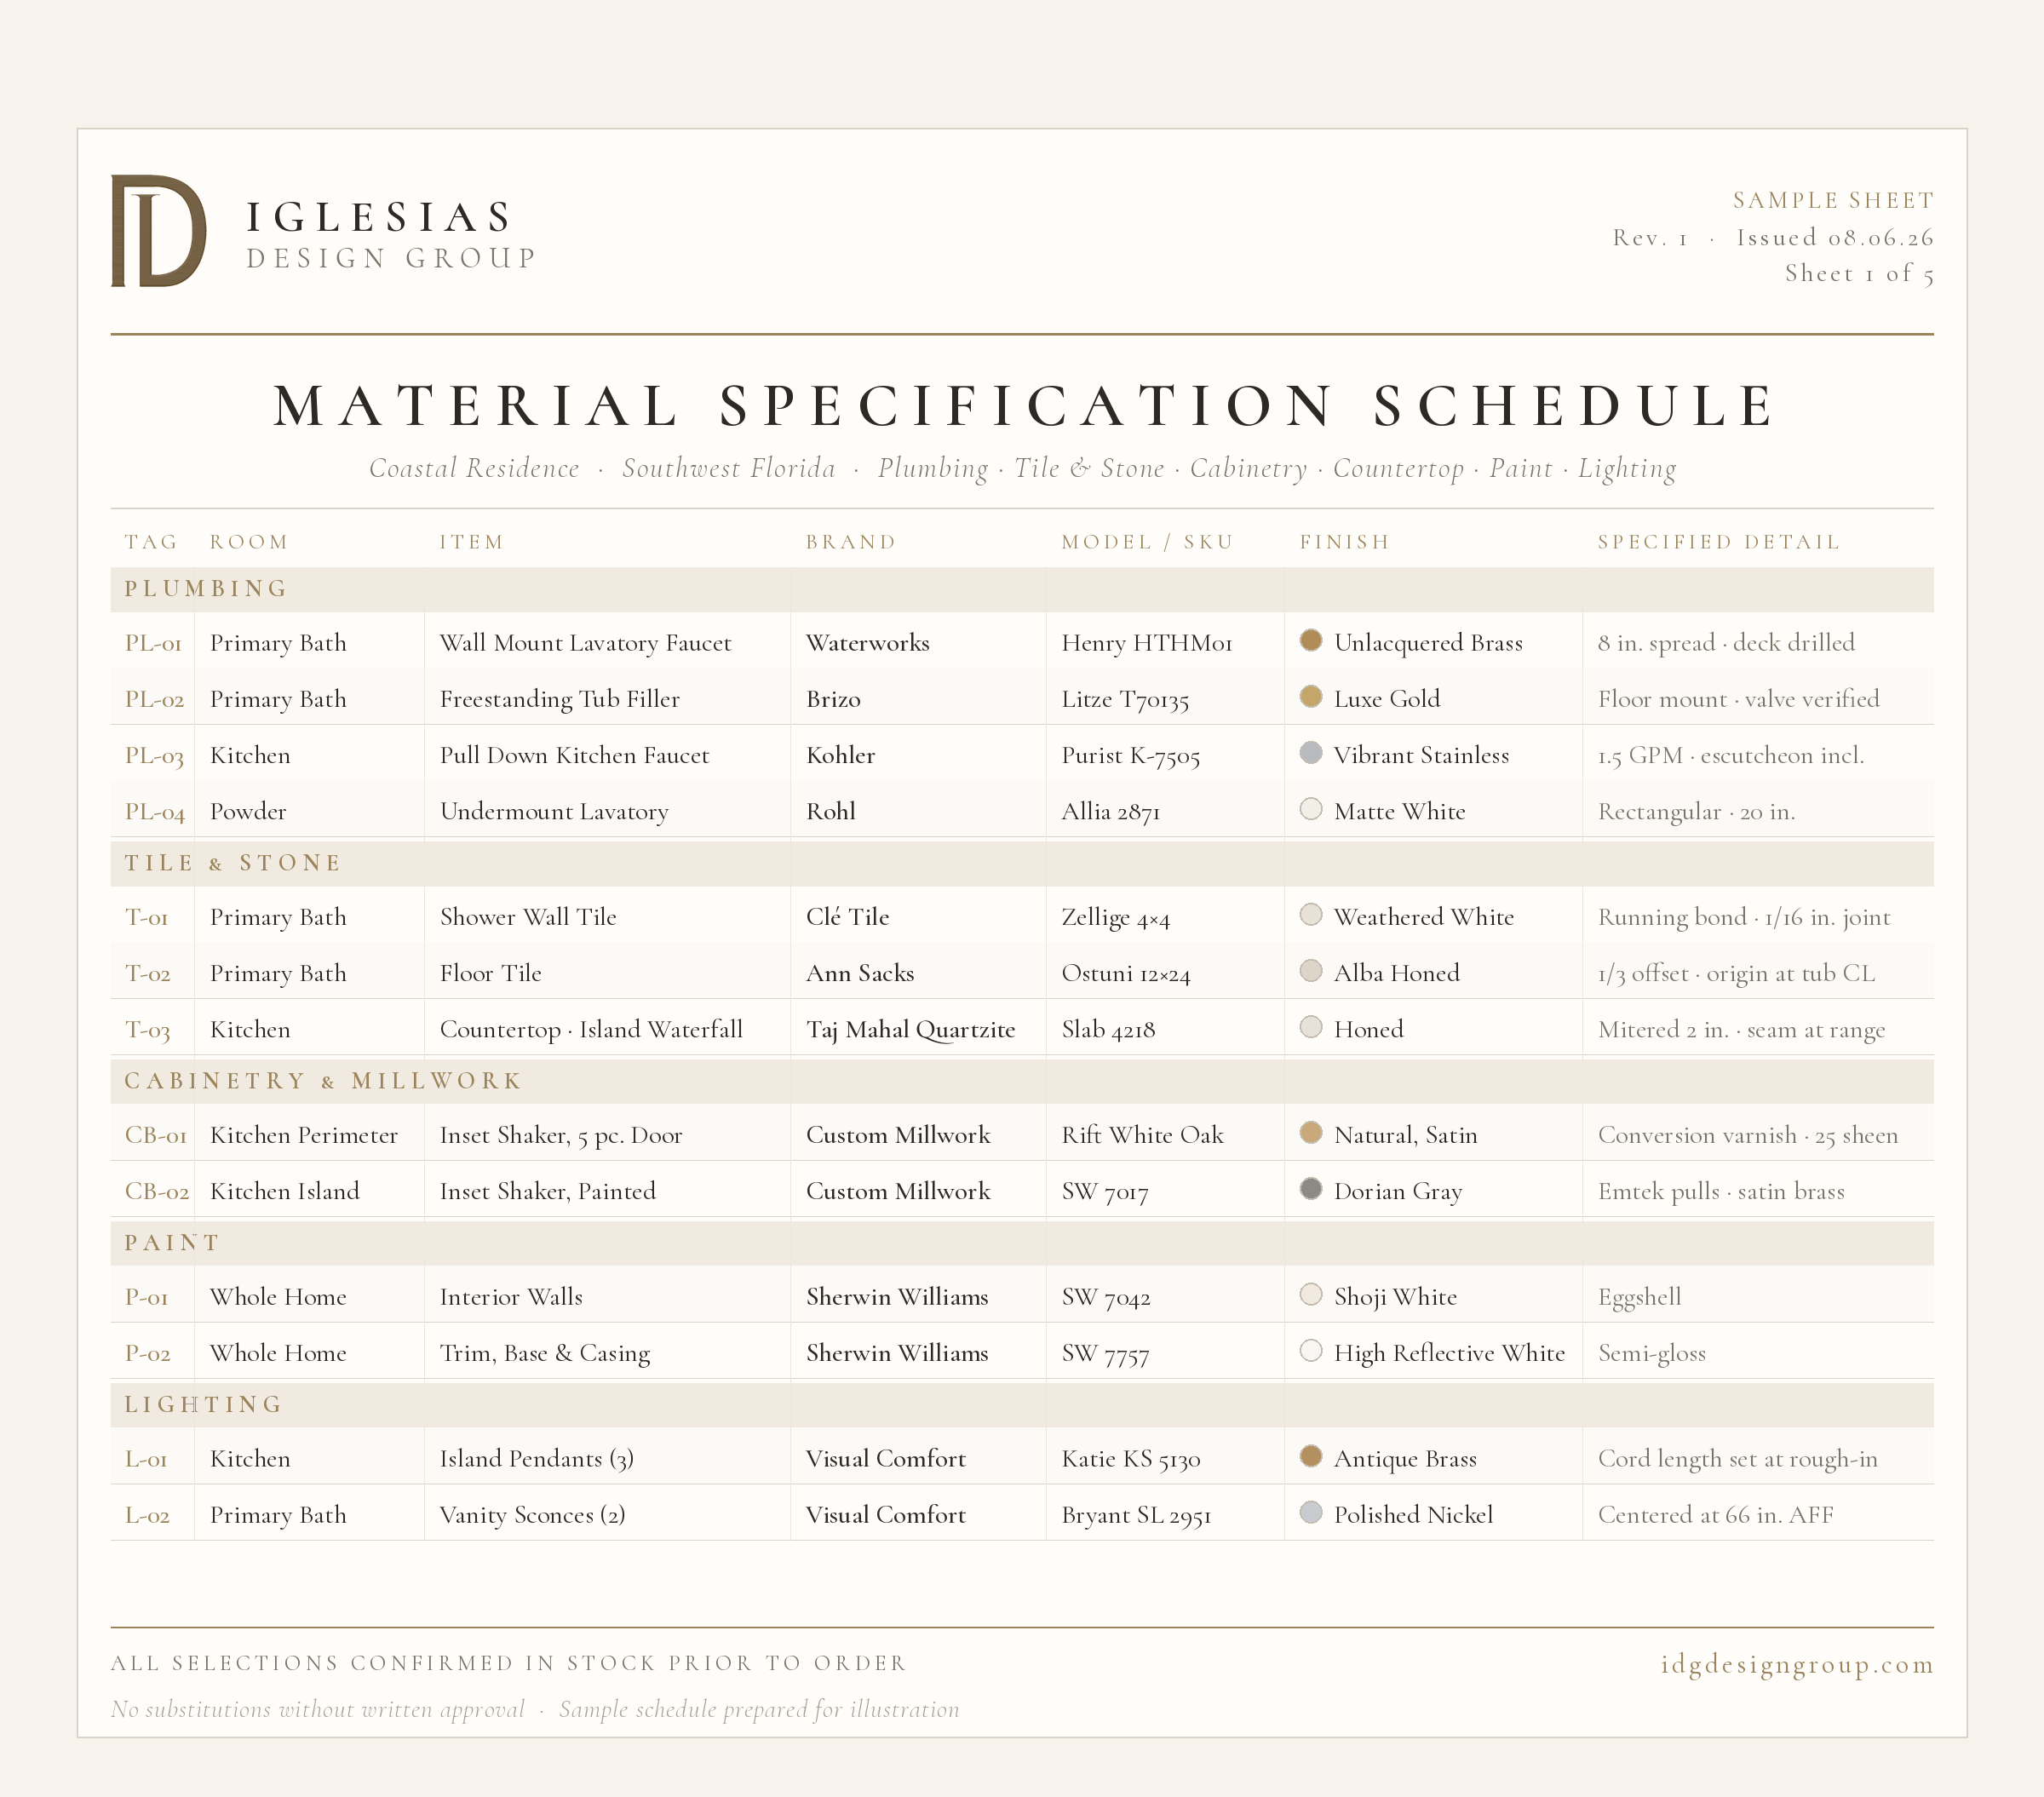
A finish schedule is a written document that lists every material and finish going into your home, item by item and room by room, with the exact manufacturer, model number, color, size, and installation detail for each one. There’s usually a separate schedule for each category: plumbing fixtures, cabinetry, countertops, tile, and paint. Together they’re the instruction manual your builder and every trade on site works from. When an item is on the schedule, it’s specified, and the decision stays yours.
That’s it. It’s a quiet document, and it’s one of the main reasons a project turns out the way you pictured it.
Design isn’t shopping, it’s deciding
Taste is the part everyone sees, and it’s the part people think they’re hiring. Pretty things, good eye, knows where to find the pendant.
The real work is deciding, in writing, before anything is finalized, what every element in your home will be, where it goes, how it gets installed, and how it relates to the six things touching it. Then translating all of that into something a plumber, a tile setter, a cabinet installer, and a fabricator can each build from with confidence.
That translation is what the finish schedules do. Here’s what goes in each one and why every piece of it matters.
The plumbing fixture schedule
Every faucet, showerhead, valve, drain, tub filler, and toilet, listed by manufacturer, collection, model number, and finish.
This is the part of the finish schedule to settle earliest, because rough-in valves get set before drywall goes up. Each trim kit pairs with a specific valve body. Choosing the trim first lets the plumber set the right valve while the wall is still open.
It also captures spout reach and height, handle placement, deck mount versus wall mount (which changes how your countertop gets fabricated), and drain finish. That last one is easy to overlook. A polished nickel faucet over a matching polished nickel drain is a small detail you’ll enjoy every day. It simply needs to be written down.
The cabinetry schedule
Door style, species or slab material, finish and sheen, inset versus full overlay, reveal dimensions, toe kick detail, interior fittings, appliance panels, and hardware down to the screw length.
Cabinet finish deserves its own moment here. “White” is a starting point, and the specification goes further. A conversion varnish in a soft matte and a lacquer in a satin look and wear very differently in a coastal home with our humidity and salt air. Sheen decides how your kitchen feels at four in the afternoon when the light is coming off the water, and how forgiving it is with little fingerprints. We like that decision in the finish schedule, with the exact finish code, where everyone can find it.
The countertop schedule
Material, slab selection and slab number, thickness, edge profile, backsplash height, waterfall returns, overhang and support method, sink cutout, faucet drilling, and seam locations.
Edge profile is one of our favorite quiet details. It changes the entire personality of a kitchen, and it’s a lovely one to show clients. An eased edge feels calm and modern. A mitered edge built up to two inches feels architectural and substantial. A bullnose feels traditional, and suits a more classic home. Fabricators follow the profile that’s written down, ideally with a drawing.
Seams matter just as much. A seam through the middle of an island is permanent. A seam tucked behind the cooktop disappears. That call belongs in the design, made before fabrication.
The tile schedule
This is the one with the most room for something really beautiful. It covers product, size, finish, layout pattern, direction, starting point, grout joint width, grout color and type, movement joints, edge treatment, transitions into adjacent materials, and waterproofing.
Layout and origin point deserve the most care. A herringbone that starts from the right wall lands full pieces in the most visible sightline and tucks the cuts into a quiet corner. That’s why layout lives in a dimensioned drawing showing where the first tile lands and where the cuts fall.
Which brings us back to grout. A sixteenth-inch joint on rectified porcelain reads seamless and refined. A quarter-inch joint on that same exact tile reads commercial. Matching grout lets the material be the star, contrasting grout makes the pattern the star, and both are beautiful. Both deserve to be chosen on purpose.
And then edge treatment, a small detail you’ll notice every day. Where tile meets drywall, we specify a metal trim profile, a mitered edge, or a bullnose, so the finish looks intentional.
The paint schedule
Brand, color name and code, sheen by surface, and scope for every room. Ceilings, walls, trim, and doors often carry different sheens. The same color in a flat versus an eggshell will read as two different colors on the same wall.
This matters more in a coastal home than almost anywhere else. The light is bright and reflective, and it comes in low across the water. A warm white chosen from a chip in a showroom can shift toward yellow in a living room by late afternoon. So we test on site, in the actual room, at a few times of day, and then it goes into the finish schedule for everyone to reference.
What all of this is really protecting
It protects the design first, because decisions made on paper keep changes on site to a minimum.
It supports your timeline, because long-lead items are specified correctly the first time and arrive ready to use.
Beyond that, it protects your relationship with your builder, which we care about a lot. A good general contractor is glad to receive a complete finish schedule set. It gives their trades clear direction and lets them move fast. Complete information keeps the working relationship smooth and friendly.
And it creates shared clarity, so if a question comes up on site, the finish schedule shows what was specified and who handles the next step.
Where the technology fits
The same discipline applies to smart home design, which is part of nearly every home we work on. Device locations, keypad placement, low-voltage runs, speaker layouts, shade pockets, all of it belongs in the finish schedule before the walls close.
A gorgeous room keeps its thermostat, switches and vents in considered places, away from the feature wall. That’s the difference design makes.
So, why hire an interior designer?
Each decision on its own is simple. There are hundreds of them, they all depend on each other, they have deadlines attached, and they have to survive contact with a job site full of skilled people who are each solving for their own trade.
A designer holds all of it. We make the decisions with you, write them down, and get them to every person who needs them. Once the build begins, we remain the voice of the design and your contractor’s expert resource on its intent.
That’s the service. The beautiful home is what comes out the other side of it.
Iglesias Design Group is a luxury residential interior design studio serving Naples, Bonita Springs, Estero, Marco Island, Fort Myers, and greater Southwest Florida. We design modern organic interiors with subtle coastal influence, from kitchen remodel design and bathroom remodel design to full-home renovation design, with smart home design considered from the very beginning. We document every project down to the grout joint.
If you’re planning a renovation or a new build and you’d like to see what a full design process looks like for your specific home, we’d love to talk. Schedule a Design Consultation to begin.
Designed by Vision. Evolved through Innovation.
Leave a Reply